TV BLOG

How use shutter-drag in your wedding photography

Shutter-drag is a technique to capture streaks of light by slowing the shutter while using a flash.It can be a tough technique to master but when you nail one it's incredibly rewarding.

The best way is to identify without the flash which lights you want to see. Prioritize keeping your iso lower so that you can keep your shutter slow enough that when you move the camera you get motion blur.

Next you want to set your flash. A shutter drag is almost like a double exposure and the subject is exposed first with the flash. The flash preserves the moment and then the extended shutter adds streaks to the image using lighting fixtures and other light sources.

The trick is to keep the photos from becoming too obscure. Every time I take a shutter drag I flick my wrist in a single direction or snap the zoom and plan the route so that the lights don't trail through the subjects face. It's not always easy to avoid. Playing around with how you move the camera and how fast you set your shutter is an engaging way to spend the end of an event.

If you are using a zoom lens try zooming in right after you snap the shutter and it creates a tunnel like effect.

Read More
Education, How to, Photography, Video Daniel Graham Education, How to, Photography, Video Daniel Graham

How to get a blurry background

Photograher : Danny Graham

Photograher : Danny Graham

Three ways

  • Shoot wide open on your aperture

  • Use a longer focal length

  • Bring the subject closer to the lens

  • (optional: fake it in post!)

Using these 3 methods you can get a shallow depth of field and make your back ground blurry. You can also use these methods to do the Brenizer Method which involves sticking multiple photos together like a panorama to create the illusion of a shallow depth of field on a wide shot.

Read More
Education, Photography, Video, Filmmaking, Funny Daniel Graham Education, Photography, Video, Filmmaking, Funny Daniel Graham

The Legendary Three Elements of Exposure

The Legendary Three Elements Of Exposure and how they shape our work

The Legendary Three Elements of Exposure

Legend has it that the first camera was forged in the ancient volcanic caves of mount Fuji . The three tribes Iso, shutti and iris were living in peace and joined forces to control over exposure and maximized dynamic range. But the volcano gods felt this was too great a power for only a few elite photographer tribes and Mount fuji erupted and consumer cameras flooded the market lowering the premium rates and putting cameras in the hands of Uncle's and nephews accross the world.

Now we study these elements to due away with automatic exposure and better the quality of our work

Lava-streaming-from-volcano-983490.jpg

Jokes aside.

The Three elements of exposure or “The Exposure Triangle” consists of Shutter speed , Aperture and ISO.

Shutter speed

There is a mechanical shutter in most cameras that opens and closes to alow light to a hit the sensor for dialed in amount of time. It opens up allowing light and then closes stopping the light. This can determine the amount of motion blur in an image. Before you go jacking up your shutter speed to 1/8000 I want to remind you that you wont always need a fast shutter and sometimes a slow shutter can be used to tell your story creativly or create really cool effects like Shutter Drag. You can also use a slow shutter to capture motion in a single image called a long exposure. you can also create an illusion of frozen time.

Photographer: Danny Graham

Photographer: Danny Graham

Aperture

Apeture which we cover here. Is the size opening of the mechanical blades within a lens that allow how much light passes through it. This is partly responsible for your depth of field.

Photographer: Danny Graham

Photographer: Danny Graham

ISO

Iso (International Standards Organization) or what used to be ASA (American Standards Association) is a tricky one. Its the sensitivity of your film or sensor. I reccomend you learn the limitations of your cameras ISO becauase this can greatly increase the amount of digital noise on your camera and using film you’ll produce a much grainier image.

conclusion

While these are not as mythical and mysterious as you may have first thought they take time to master and learning them will greatly improve the quality of your work

Read More
Education, How to, TV Hack Daniel Graham Education, How to, TV Hack Daniel Graham

TV Hack #1: Leak proof your lens cleaner.

Timeline Visuals does not promote the use of bread crumbs as lens cleaner.

TV Hack #1: never leak lens fluid again

So my problem was, I kept buying Zeiss lens cleaner (I will, without fail spell it Ziess at-least once in this post). I would try to always have one in my bag, (I’m a notorious packer and re-packer). This would be fine when the clear plastic cap was on, but it would eventually crack or break and I would have to leave it in my bag without a cap. Now the cap doesn’t lock, so the bottle would just continuously leak. Some bags have dedicated plastic pockets. But if I was taking a travel bag or just placing it In my regular back pack, then it would leak and soak my bag. Sometimes I could place it more efficiently, but ultimately this required more attention. Because placing it somewhere in a bag where it wouldn’t leak is really just a work around.

I tried looking for a lens cleaning bottle that has locking caps. I figured that would be a no brainer, but I actually had no success. So I started looking for spray bottles that lock and I stumbled upon perfume atomizers. They’re these travel sized spray bottles, that twist to lock and are perfect to throw in your pocket or camera bag, without having it leak all over. You can also buy them empty for making your own perfume.

I’ve shared this issue with people before and got mixed reactions, but maybe it’s due to my failure to properly explain the problem. I think my neurotic over thinking usually routes me to find an alternative, even if there are already common solutions to the problem. This would appeal to companies that manage crews or multiple cameras. Buying bulk lens cleaner and distrusting it amongst several bags, is a great way to know that you’re always prepared. (Not saying you should constantly clean your lenses either, doing so will eventually wear down the coating. However, being in a scenario where something is effecting the image quality and not having the fix handy is what I want to avoid.)

I’ve included links to these products through out this post. They are affiliate links and we do make a few pennies if you happen to purchase through our link. But feel free to search for “perfume atomizer”, if you want to shop around for yourself. We don’t aim to profit off of our readers so aggressively. Click any of the related links or images in this post to open one.

I found a set of atomizers that was plain looking enough to blend in with the rest of my gear, without them being too over the top. Click the image on the left to open the amazon page.

But there are a lot of options available. So if you’re a little extra proud, it can definitely be a unique addition to your bag. I’m sure you could find something impressive.

I use Zeiss Lens Cleaner but some of my filmschool reader may resignate more with Pancro

Fun fact: I spelled Pancro as panko throughout college and could never end up finding it online. DO NOT put Panko on your lens, you can use Pancro instead. It is far more efficient.

Thanks for reading! If you want to learn more about Timeline Visuals and what we do, visit our website!

Read More
Education, How to, Photography, Concept Dump Daniel Graham Education, How to, Photography, Concept Dump Daniel Graham

Timeline Visuals Halloween Concept Dump!

Please do not sacrifice your neighbors cat, no one is asking you to do that.

Timeline Visuals Photographer: Danny Graham & Model:Seana

The way I usually create concepts is to come up with a few props and then try to tie it all into a theme. It's not always some glamorously brilliant concept that’s tied to some society based theme, making the statement of a century. Sometimes a concept can just be the light from a candle and how cool your Sony a7siii is in lowlight. Then, you can run with it. Candles go well with darkness because they stand out. Halloween is all about dark and creepy. So making a dark Halloween themed concept around candles is a great choice. You could branch into messing with other creepy things that use candles.

Here are 5 concepts that you can try for yourself this Halloween season.


I’ve included links to the props throughout this post. They are affiliate links and we typically make a few pennies if you purchase a prop through our link. But feel free to search for them outside the post. We don’t actually aim to profit off our readers so aggressively. Click any of the related links or just click the images to open one.


Cults.

My mom doesn't have shit on a Cults’ candle burning output. So putting 2-3 models in creepy white nightgowns, inside an empty room with some jar of colored liquid could be a great concept. Just don't actually perform any ritual sacrifice, killing your neighbor's cat in the name of Satan is universally frowned upon.

Pro tip: Keep a fire extinguisher handy. Nothing says unprofessional like committing arson.

You could probably use an led light with something like this. Screw inefficiency. Cameras are getting better in lowlight, but I’m always alright with faking a few things.

Grave keeper

Nothing says Halloween like a man who declines the efficiency of a high powered led, and instead walks through a cemetery with box full of my wife's tea lights.

Blood.

Filling a bathtub with some nontoxic red liquid, and then surrounding it with candles would be pretty sweet.

Spawn of Satan

A nude /semi nude model with prosthetic horns, covered in a clear gel and some elements of fake blood would look awesome to shoot. Maybe while coming out of a dark cellar or basement.

Knives

I hate knives. Be careful, but jamming a bunch of old used kitchen knives that you got off of Facebook marketplace and forming a circle into a wall, or even the ground could be a cool background.

Probably one of the stranger things I've had in my Amazon cart

Probably one of the stranger things I've had in my Amazon cart.

Read More
Education, Photography, Video Daniel Graham Education, Photography, Video Daniel Graham

Shutter Speed, Whats that?

What is Shutter Speed?

I just took your photo, wanna see me do it again? Wanna see me do it in slow-motion?

Photographer : Danny Graham -Engagement session at Raymond skills falls in PA, using a faster shutter speed to preserve a frozen moment.

Photographer : Danny Graham -Engagement session at Raymond skills falls in PA, using a faster shutter speed to preserve a frozen moment.

Photographer : Danny Graham - Using flash and a relatively fast shutter to preserve the bride’s cousin’s dance moves, at her wedding at Casa Bianca in New Jersey.

Photographer : Danny Graham - Using flash and a relatively fast shutter to preserve the bride’s cousin’s dance moves, at her wedding at Casa Bianca in New Jersey.

The camera’s shutter is a mechanical (sometimes digital) device, that opens and closes for a predetermined amount of time. (There is also an open shutter for long exposure shots.)

Shutter is measured in parts of a second. Examples are 1/10,1/15, 1/30,1/60, 1/120, 1/240, but also in full seconds 1s , 5s ,10s.

Photographer Danny Graham, captures spark using a fast shutter during bride and grooms first dance at Casa Bianca in New Jersey.

Photographer Danny Graham, captures spark using a fast shutter during bride and grooms first dance at Casa Bianca in New Jersey.

The amount of time that the shutter is open or that the sensor is accepting light, determines the exposure of the image. It also determines how much motion blur the image gets or doesn't get.

Photographer : Danny Graham - Model Seana, stands in front of a moving train. Here we’re using a slow enough shutter to capture the motion of the train, but it’s still fast enough to preserve the model’s details.

Photographer : Danny Graham - Model Seana, stands in front of a moving train. Here we’re using a slow enough shutter to capture the motion of the train, but it’s still fast enough to preserve the model’s details.

Before you go cranking your shutter up to 1/8000, keep in mind that there are times when the motion blur from a slower shutter can be desirable. You can show a fast moving object, with a still world to emphasize the contrast of energy.

Photographer : Danny Graham - Entrance sparklers captured with some motion blur.

Photographer : Danny Graham - Entrance sparklers captured with some motion blur.

A fast moving subject can be followed as it passes, producing a clear crisp subject and it can emphasize the motion in a single image. Or you can always use a flash to preserve your subject and blur the background, using a process called Shutter Drag. Common examples are often used in motorcycle photography.

Photographer : Danny Graham - Capturing friends and motion blur on the dance floor. Wedding/Event @ Casa Bianca in Oak Ridge, NJ

Photographer : Danny Graham - Capturing friends and motion blur on the dance floor. Wedding/Event @ Casa Bianca in Oak Ridge, NJ

Photographer : Danny Graham - Using shutter drag with a flash and a slower shutter speed. Wedding/Event @ Casa Bianca in Oak Ridge, NJ.

Photographer : Danny Graham - Using shutter drag with a flash and a slower shutter speed. Wedding/Event @ Casa Bianca in Oak Ridge, NJ.

Contrast to using motion blur, you can always crank up the shutter and freeze motion. This can be awesome when capturing moments that are typically too quick to appreciate all of the fine details. Like someone or something frozen in mid air, or the spray of water, dirt or dust.

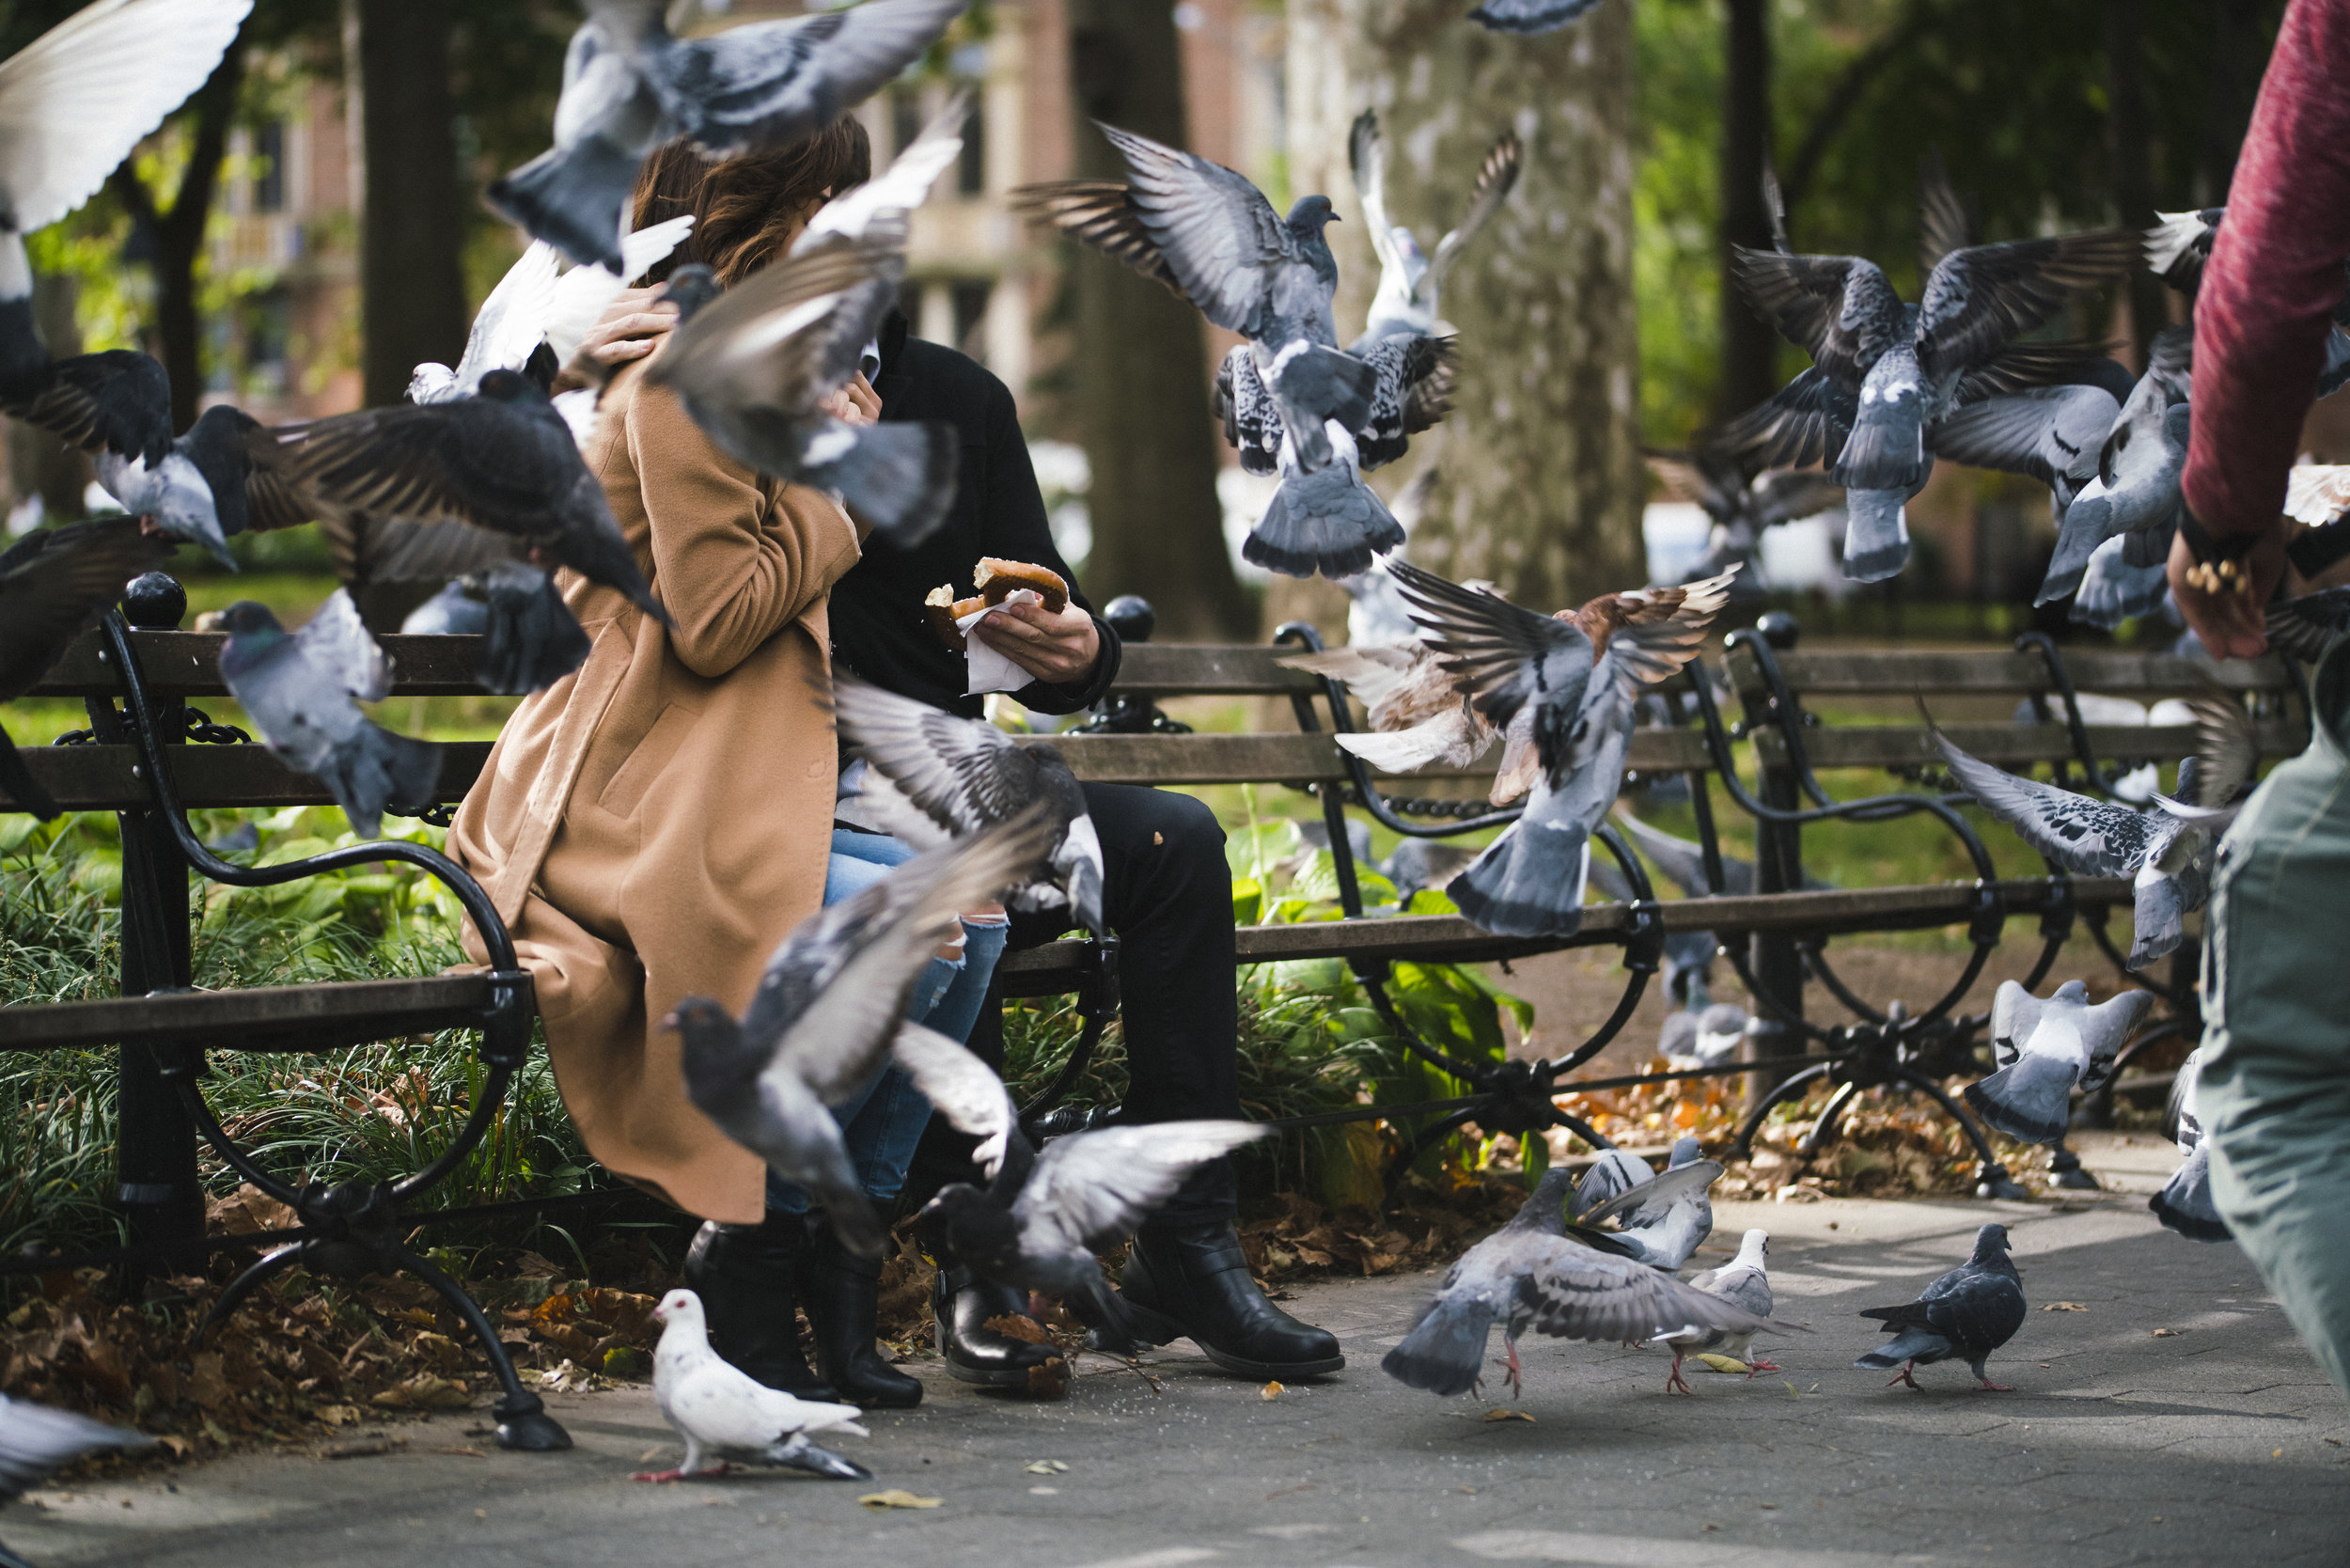
Photographer : Danny Graham - Shooting pigeons in a NYC park. The birds are frozen in time, using a faster shutter speed.

Photographer : Danny Graham - Shooting pigeons in a NYC park. The birds are frozen in time, using a faster shutter speed.

For video : Typically, you double or divide your shutter in half, in order to move up and down full stops of light. For video, it's often advised to follow the 180 rule. This is the perceived cinematic “normal”, in which you are doubling the frame rate to identify the shutter. Using the 180 rule, if you shoot in 24p as a frame rate, than your shutter should be set to 1/48 or 1/50. This is not so much a rule, but more of a guide. I encourage you to experiment with different frame rates and faster shutters, to produce crisper motion with less motion blur.

Photographer : Danny Graham - Captures a drummer playing mid-beat.

Photographer : Danny Graham - Captures a drummer playing mid-beat.

Photographer : Danny Graham - Capturing some entrance sparklers, while balancing the exposure and also timing the moment for the Bride and Grooms exit at Crystal Springs Ballyowen Golf Club in Hamburg, NJ.

Photographer : Danny Graham - Capturing some entrance sparklers, while balancing the exposure and also timing the moment for the Bride and Grooms exit at Crystal Springs Ballyowen Golf Club in Hamburg, NJ.

Hopefully this helps you to better understand shutter speed and how it works. It’s used as a lot more than just a way to control the exposure, so I hope that this knowledge can help your photography grow. Thank you for reading!

Visit our photography portfolio, or follow us on social media!

Read More
Editing, Filmmaking, Video, Education Daniel Graham Editing, Filmmaking, Video, Education Daniel Graham

How much should a video cost?

DSC06478+%282%29.jpg

Most people don’t ask us this directly. However, I think it’s safe to assume that most business owners are always cost conscious. And if you are throwing an event, then you may be thinking about your own budget as well.

When factoring the costs, you’ve likely already determined the importance of video and how much you should plan to budget for. You might also be worried that it might cost too much and that your marketing plan will fall apart and leave you empty handed.

I’m going to give you a rough idea of what you can do to minimize costs overall, and hopefully enlighten you as to where these costs are established from.


DIY - Free

Yes, I’m starting with the freebie. Tik Tok, Instagram, Facebook and plenty more are all flooded with videos that are super successful. This is primarily because of cell phones, and what we associate the quality with. When a cellphone video is relatable, the content’s success is almost directly a result of the story or the information that it tells. The quality of the video is not what sells this kind of video. However, that doesn’t mean that it’s easy to make great content on your phone. Timing, aesthetics and tone all have a huge influence in how relatable your content is. If you can make your audience/ideal clientele feel connected to your brand, then this part will be easy.

Have a plan - We’re not necessarily making a Hollywood blockbuster, but you do need to have an idea for your video. First, decide your goal, then think creatively. What in life reminds you of this goal’s outcome? And what may remind others of it too?

Don’t drag it out - Cut to the chase! Only show the important parts of your video. Don’t make viewers watch the extra 6-7 seconds that you took to cut the ending of your Instagram story. If you bore the audience for even a brief second, you lose the effectiveness of your video.

Be patient - Don’t rush to post your newly created content immediately. I know you’re probably thinking, “Holy HubSpot Batman! We’ll never have time to make all of this content!”. And while that might be true, the important thing here is to not panic. Focus on quality of your content, and not necessarily on the quantity. If you need to, try posting less frequently.

Edit, edit, EDIT! - There are plenty of free programs out there like Davinci Resolve, iMovie and Wondershare’s Filmora. And unless you are telling stories that are carefully planned and timed out, you’ll likely benefit from cutting it in post. Acting requires lots of practice, and not everyone is going to nail their take on the first try. You can easily run the risk of either spending way too much time on your video, or compromising with an inferior product.

Put your video together with a few simple cuts, that are timed to tell your story. There’s an illusion of time you can create using cutting and lots of other little tricks can progress a day, months or years into even a 15 second video. If the idea of sitting at a computer for a few hours and developing severe nerd neck seems dreadful, you can always hire a video editor to help out with some of the heavy lifting.

Record Clean Audio - My audio buddies are most likely smiling while reading this. Audio plays a massive roll in video. Bad audio can ruin a good video, as much as a bad video can ruin good audio. Make sure that your audience hears what you want them to hear, and don’t become too distracted by the background fuzz or any passing cars. Practice yelling “QUIET ON SET! “ at your neighbor mowing his lawn and then record yourself clearly telling your dog that they’re a good boy. Because then people will know who’s a good boy.. he is. But it is always worth investing in a decent microphone, if you plan on doing this alone.

Add Music - Unless it’s a montage, the music should be mixed into your video, in order to not drown out any dialogue. Music can be extremely moving, so make sure that it’s moving people in the right direction. Hopefully that direction doesn’t result in hard work being removed, for copy right infringement or worse, penalties and fines. Be sure to purchase or acquire royalty free music, with an appropriate license whenever necessary.

Bonus - Beef up the video quality with a DSLR or Mirrorless camera and a decent lens. Below are some good entry level options.


Hire A Team

Be a video producer and create a team. Be sure to have a plan fleshed out for your content. Ultimately you, or your marketing specialist should be guiding the content that you need efficiently. If you just need to make engaging content for your businesses’ social media page. It may be most efficient to do most of this yourself, and hire professionals to fill in the gap. All of these positions can be learned by yourself, but the key take away here should be that you are in the business of your industry. So focus on your industry and not necessarily learning a new one. However, it’s always helpful to have the knowledge needed in order to guide the team efficiently.

I reccomend using Fiver if you are looking for affordable services. It’s a gamble to use people without a trusted referral, but you can search for services that compliment potentially existing strengths.

Timeline Visuals - Video Editing “Battle-Station”

Timeline Visuals - Video Editing “Battle-Station”

Video Editors

Editors can cost between $75 - $150 per hour or more. The amount of time that they take depends greatly on the direction you’ve given them. If you want to cut costs, try to give good direction. Write out a paper edit, with what clips you want included, how long you want them and in what order. Pick the music ahead of time. The less that the editor needs to think, the faster they can turn around. But also consider the rendering and exporting times. If you deliver massive video files to your editor, it will take them a lot longer to render them, compared to a simple 30 second video from your cell phone. Though the mp4 files probably look pretty sweet from your new a7III, any experienced editor is likely going to transcode them to an editing format. And depending on your resolution, this process and the amount of time that it takes to export can vary. It’s likely going to add an hour or two by default.

Production Behind the Scenes by Timeline Visuals

Production Behind the Scenes by Timeline Visuals

Videographers / Cinematographers

A good video guy is going to cost between $100-$150. But they may also want to book a guaranteed 2-3 hours, to ensure the time was worth lugging all their expensive gear to the shoot location. Be considerate that this is their profession, and they often invest a large amount of money into quality gear. If you are looking for cheap work, than you’re likely going to have a lot of hit or miss projects. If that’s okay with you, then ask away. Personally, I believe that paying people a fair wage and being considerate is the best way to bring quality help. Be collaborative, and form strong working relationships. You will find that it will go a long way in the quality of your content.

Yves - production sound guy - for Timeline Visuals production company

Yves - production sound guy - for Timeline Visuals production company

Sound Op - This is often a dedicated person. Like cameras, there is a lot of complex functions of microphones and recorders. Hiring a good sound guy helps ensure that there are no missed sound bites, just because the camera guy was to busy pulling focus to notice that the levels were peaking. Or while fixing their lighting setup, they didn’t notice that the lav mic battery was low and ended up missing a whole take. Do yourself a favor and avoid putting too much pressure on a single professional. It will eventually burn them out.


Hire a Production Company

This is more of a premium concept. It might only be worth hiring a production company, when you need a premium video. Like a branded video, that needs to stand the test of time demonstrating your company values for your website. Or when you’ve grown your company to the point that you want to leverage your business as being of higher value, through beautifully crafted videos. Investing in your image, is investing in your brand. Hiring a production company, giving them a goal, allowing them to a source write and handing off creative control, can give you the freedom to focus on your business. Or even on just enjoying your personal life. Allow an experienced team like us at Timeline Visuals handle the production end of things, so that you can sit back and relax!

Timeline Visuals Production Company

Timeline Visuals Production Company


This page contains Amazon affiliate links. If you choose to purchase one of these products, we will be compensated and at no cost to you. This helps us to continue writing quality content for readers like you. Thank you for reading!

Read More
Photography, Video, Education Daniel Graham Photography, Video, Education Daniel Graham

What is Aperture?

Photo By: Danny Graham  (Wantage , New Jersey , 07461)

Photo By: Danny Graham (Wantage , New Jersey , 07461)

Image credit: https://en.m.wikipedia.org/wiki/Aperture

Image credit: https://en.m.wikipedia.org/wiki/Aperture

In photography and video, a lens’s aperture is a set of blades that open and close to control the amount of light passing through the lens. It is part of the Three Elements of Exposure.

The way that the number is represented is called an F-stop, and it’s labeled as “f/” followed by a number like 1, 1.4 ,2, 2.8 , 4 , 5.6 , 8 , 11 ,16 , 22. These are all full stops, but you may also see numbers like 1.2, 1.8, 3.2, 4.5 , ect. These examples instead follow a 1/3 stop.

Camera-lens-676829.jpg

This article has a great chart of the different measured stops

Similarly you may find T stops on cinema lenses, which are measured more extensively for motion picture. More on T stops here.

Summary

Aperture has a large play in the DOF (Depth of Field). Depending on your subject, you may want to open or close your aperture in order to create a greater depth of field. For example, if you are shooting landscape photography, then you may want a greater depth. And with portraits, you might want isolate your subject from other details in the frame. If you are just starting out, a great option to learn DOF is a 50 1.8 (Nifty-50). These are typically inexpensive, and you’ll be able to see the specific changes in DOF (more specifically on the shallow end).

The following image was taken several years ago with my old Canon 60D and Canon 50mm F/1.8. this camera and lens can likely be found together used for sub $200

Image by Danny Graham: Taken with Canon 50mm F/1.8 and Canon 60D

Image by Danny Graham: Taken with Canon 50mm F/1.8 and Canon 60D


This page contains Amazon affiliate links. If you choose to purchase one of these products, we will be compensated and at no cost to you. This helps us to continue writing quality content for readers like

Photographer: Danny Graham

Photographer: Danny Graham

Photographer:

Photographer: Danny Graham


Read More
Tech, Editing, Education Daniel Graham Tech, Editing, Education Daniel Graham

How to choose an editing monitor

This is a loaded question and is often confusing for people. Searching monitors for color grading you may find a Flanders scientific monitor and may hear that its the way to go.

Thats not true for everyone.

If you are doing major print or cinema work being premiered in a theater then a high end monitor may be the best choice for you.

However if you are like me shooting web based content, weddings, and minor print work then you don't need to buy a crazy expensive monitor.

Timeline Visuals “Battle station” 2018

Timeline Visuals “Battle station” 2018

How do I choose a monitor?

This is a loaded question and is often confusing for people. While searching different monitors used for color grading, you may find articles and forums talking about Flanders scientific monitors and think that it’s the right way to go.

This is not true for everyone.

If you are doing major print or cinema work that’s being premiered in a theater, than a high end monitor may be the best choice for you.

However, if you are shooting web-based content, weddings or even minor print work, than you don't need to buy a crazy expensive monitor.

Why is it important?

If your monitor is off, the work you show to the world will only look as you saw it on that specific monitor. Having an accurate monitor, while not fool proof, will help immensely in displaying media the way that it was intended. It’s also important to cross reference your projects on different devices, to build a full understanding of how this works.

What kind of work do you typically do?

If you primarily make web-based content for social media and your website, then sRGB accuracy will be your selling point. But it is good to know the range of important factors, to help make an educated purchase.

 Here are a few good monitors for the line of work described.

These are Amazon affiliate links. If you choose to purchase one of these products, we will be compensated and at no cost to you. This helps us to continue writing quality content for readers like you. Thank you for reading!

Asus Pro Art

(Budget Friendly)

Pros

  • Accurate color 100% sRGB &

    rec 709

  • IPS

  • Extra: 75hz is decent for gaming.

  • Low cost

Cons:

  • Only 1080p

  • Small; 23.8in (this may be better for people in tight spaces)


Pros:

  • Accurate Color: 99% Adobe RGB, 100% sRGB, 100% Rec.709

  • Factory calibrated

  •  Includes sunshade

  • Relatively affordable

  • Sharp 2k resolution

  • Controller puck for changing settings.

  • USB connection for software calibration

  • 10 bit color depth

Cons

  • Only 2k in resolution

  • More expensive then some other options

What to look for.

The following info is to give you a basic understanding of what to look for in a good monitor. I’ve also linked a few articles that I find helpful and more in-depth.

Color Accuracy

sRGB

If budget is a concern, than you’ll want the most accurate sRGB that you can afford in your price range. But this should be standard for any monitors that are accurate in the following spaces.

pulled from https://fstoppers.com/pictures/adobergb-vs-srgb-3167

pulled from https://fstoppers.com/pictures/adobergb-vs-srgb-3167

Adobe RGB

Similar to sRGB, but with more range.

Here is a good article from Fstoppers.com on the comparison (AdobeRGB vs sRGB)

Rec 709

This is almost identical to sRGB in the sense that it's the same color space. It is the standard for HD video. The difference is primarily it uses a different Gamma then the others.

 (More on rec 709 here)

Color depth

There are a variety of bit depths in monitors, but here are two of the more common examples.

10-bit

10-bit monitors are becoming more and more relevant. It’s only a matter of time until they become the standard in LCD and LED panels. But until that day comes, they’re used primarily for printing work and also for your own viewing pleasure. Being able to see your work in it's 10-bit glory is always a pro.

8-bit

8bit is often "good enough". Although pros may point their nose in the air, most viewers will ultimately be seeing your work on an 8 bit screen. Therefore displaying on 10-bit might only be distracting you from grading your image for the proper audience.

More info on bit depth (Article on 8 bit vs 10bit here )

Resolution

High resolution will help identify the details of your image clearly. Most 4k or 2k screens are great to see your image clearly.

More on screen resolution Screen resolution: The ultimate guide

Viewing Angle

 You want to be able to view your monitor at slightly obscure angles, and still retain visual accuracy. IPS panels are great for this and can also help to retain more accurate color info

For more details on IPS (Advantages and Disadvantages of IPS LCD Panels)

Factory Calibration

Factory calibration is somewhat important, because it means the monitor was tested to be accurate. Even though the tests do vary, it’s nice to know that it went through some form of quality control to better assure the accuracy.

For details on factory calibration, this page is somewhat bias but might help to clarify some things.

Why You Need a Factory-Calibrated Monitor

Even though it is factory calibrated, you should still look into calibrating your monitor yourself . It’s often recommend that you calibrate your monitor every 6 months, but some suggest as little as every 2-6 weeks.

Hardware vs. Software Calibration

Monitor calibration tools

I personally use the Spyder 5, but either of these tools will do.

X-Rite i1Display Studio

Datacolor SpyderX Pro


Thank You

For taking time to read this post. I hope you found some of this information valuable and look forward to post future articles for you in the future!

extra

Monitor Arms

I find that having at-least 2 monitors can help multitasking, by providing extra screen real-estate. Having a dual monitor arm prevents the clutter.

Below is a link for a heavy-duty dual monitor arm, that I personally use for my 34in LG Ultrawide and for my 27in BenQ.

Read More

How wedding vendors avoid going deaf

Wedding receptions are loud. If you're in the business of working weddings, you should consider protecting your ears with ear plugs.


This page contains Amazon affiliate links. If you choose to purchase one of these products, we will be compensated and at no cost to you. This helps us to continue writing quality content for readers like you. Thank you for reading!


HOW WEDDING VENDORS AVOID GOING DEAF.

Wedding receptions are loud. If you're in the business of working weddings, you should consider  protecting your ears with ear plugs.

Funny-grandpa-dj-586439.jpg

Any ear plug will Ultimately do.

Audiologist-examining-patient-562856.jpg

The goal is to preserve your hearing and avoid going deaf.

High Fidelity Earplugs:

I prefer using high fidelity to make out what my clients, guests or other vendors are saying more clearly and they don't distort the audio as much. They are designed to just lower the decibels.


Loop

These are currently the ones I use. I prefer the fit.

Vibes

These look like they fit similarly to loops but are designed to be low profile to look less obvious .

Eargasms

I owned these previously, they work well but my ears never got use to the fit.

Decibullz

For a custom fit Decibullz offer the same high fidelity but you can mold the plugs to your ear specifically.

Thank You

For taking time to read this post. I hope you found some of this information valuable and look forward to post future articles for you in the future!

Read More